How to Add a Pregnant Woman as a Beneficiary in Poshan Tracker
If you’re an Anganwadi Worker and a new pregnant woman in your area hasn’t been registered in Poshan Tracker yet, or you’re a pregnant woman yourself trying to get connected to your nearest Anganwadi Center — the process differs slightly depending on which side you’re on. This guide covers both.
I’ve kept this as practical as possible, because in the field (or at home, trying to do this yourself), most of the confusion isn’t about the concept — it’s about which button to tap and which document to keep ready. Let’s go through it step by step.
Two Ways to Register
There are two routes to add a pregnant beneficiary in Poshan Tracker:
- Through an Anganwadi Worker (AWW) — still the most common and reliable route
- Self-registration through the Beneficiary Module — a newer feature that lets any pregnant woman apply on her own by selecting her nearest Anganwadi Center
If you’re an Anganwadi worker, follow Method 1. If you’re the beneficiary (or registering on behalf of a family member), jump to Method 2.
Method 1: Registration by the Anganwadi Worker
Step 1: Log Into the App
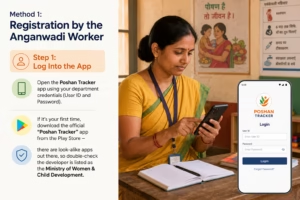
Open the Poshan Tracker app using your department credentials (User ID and Password). If it’s your first time, download the official “Poshan Tracker” app from the Play Store — there are look-alike apps out there, so double-check the developer is listed as the Ministry of Women & Child Development.
Step 2: Open Beneficiary Registration
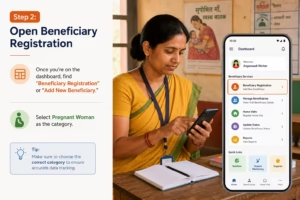
Once you’re on the dashboard, find “Beneficiary Registration” or “Add New Beneficiary.” Select Pregnant Woman as the category.
Step 3: Check the Family Survey
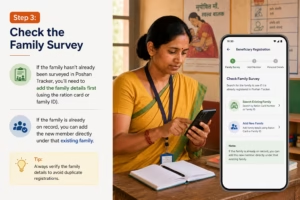
If the family hasn’t already been surveyed in Poshan Tracker, you’ll need to add the family details first (using the ration card or family ID). If the family is already on record, you can add the new member directly under that existing family.
Step 4: Enter Personal Details
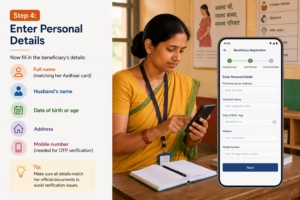
Now fill in the beneficiary’s details:
- Full name (matching her Aadhaar card)
- Husband’s name
- Date of birth or age
- Address
- Mobile number (needed for OTP verification)
Step 5: Aadhaar Verification
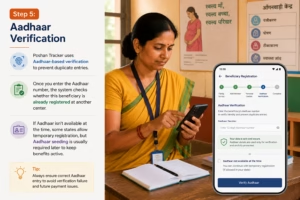
Poshan Tracker uses Aadhaar-based verification to prevent duplicate entries. Once you enter the Aadhaar number, the system checks whether this beneficiary is already registered at another center.
If Aadhaar isn’t available at the time, some states allow temporary registration, but Aadhaar seeding is usually required later to keep benefits active.
Step 6: Pregnancy-Specific Information
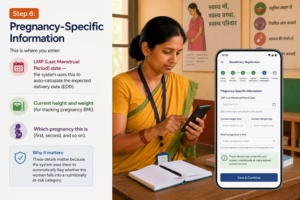
This is where you enter:
- LMP (Last Menstrual Period) date — the system uses this to auto-calculate the expected delivery date (EDD)
- Current height and weight (for tracking pregnancy BMI)
- Which pregnancy this is (first, second, and so on)
These details matter because the system uses them to automatically flag whether the woman falls into a nutritionally at-risk category.
Step 7: Submit and Confirm
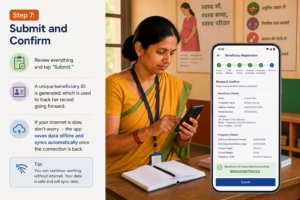
Review everything and tap “Submit.” A unique beneficiary ID is generated, which is used to track her record going forward.
If your internet is slow, don’t worry — the app saves data offline and syncs automatically once the connection is back.
Method 2: Self-Registration by the Beneficiary
This route works well when a new woman has moved into an area and wants to register herself, or when reaching the local Anganwadi worker directly is difficult.
- Open the Poshan Tracker app or the official website
- Select the “Citizen/Beneficiary” section
- Enter your mobile number and verify with OTP
- Search for your nearest Anganwadi Center (by location or pincode)
- Fill in your details — name, pregnancy information, address
- Once submitted, the application goes to that center’s Anganwadi worker for approval
- After she verifies and approves it, you receive your official beneficiary ID
This method is particularly useful in urban areas, where an Anganwadi worker handles a large caseload and someone can occasionally slip through the cracks.
What You’ll Need Before You Start
Keep these ready to make the process quicker:
- Aadhaar card (the beneficiary’s, and ideally the husband’s too)
- A mobile number that can receive an OTP
- Ration card or family ID (if the family hasn’t already been surveyed)
- LMP date (date of last menstrual period)
- Current height and weight
Common Problems and Fixes
Aadhaar name mismatch: If the name entered doesn’t exactly match the spelling on the Aadhaar card, the system may throw an error. Always use the Aadhaar’s exact spelling.
OTP not arriving: Weak network can delay SMS delivery. Wait a couple of minutes and try “Resend OTP.”
Duplicate beneficiary error: If the woman is already registered at another Anganwadi Center (say, from a previous address), you’ll need to follow the transfer process instead of creating a fresh registration.
Data submitted but not showing on the dashboard: Usually a sync issue. Reopen the app on stable Wi-Fi or mobile data — it typically syncs within a few minutes.
What Happens After Registration
Once registered, Poshan Tracker automatically starts tracking the beneficiary for:
- Scheduled health checkups and ANC (antenatal care) visit reminders
- Iron and folic acid supplement distribution records
- Take Home Ration (THR) eligibility
- Automatic home visit scheduling if flagged as a high-risk pregnancy
Tracking weight and height through pregnancy is important for staying on top of nutritional status. If you’d like to check this yourself between official checkups, our free Pregnancy Weight Gain Calculator gives an instant result based on WHO standards.
Frequently Asked Questions
Q1. Can a pregnant woman be registered without Aadhaar?
Some states allow temporary registration, but Aadhaar seeding is usually required to keep long-term benefits like THR active.
Q2. How long does registration take?
With documents ready and a decent network connection, the whole process typically takes 10–15 minutes.
Q3. Can the same woman be registered at two different Anganwadi Centers?
No. Aadhaar-based verification exists specifically to prevent this. If she’s moved addresses, the transfer process should be used instead of a fresh registration.
Q4. What if there’s no mobile number available?
A family member’s number can be used, but that same number will need to be accessible to receive the OTP.
Q5. How do you correct details entered incorrectly after registration?
The Anganwadi worker can update most fields through the “Edit Beneficiary” option on the dashboard. Larger changes, like the Aadhaar number, may need supervisor approval.